
XSL and Looping Blocks Overview
XSL stands for Extensible Stylesheet Language, and is a style sheet language for XML documents. XSL can be used within Cheetah Digital Campaigns to create looping blocks that access customer-specific data across numerous tables, filter and transform that data as needed, and display that data in a variety of different layouts within the campaign.
Key XSL concepts and elements
This document is not intended to be a complete reference guide to XSL, but rather to provide a general overview of the XSL language and introduction to some of the most common elements and functions applied within Cheetah Digital campaigns.
Document structure
The way XSL typically works is that an XML (“source”) document links to an XSL document to attain instructions on how to output the respective data. In Messaging we don’t actually see the XML document, so primarily we need to be concerned with proper formatting of the XSL. (Later we will discuss how to visualize, and even generate, the XML tree information needed to properly align with our XSL).
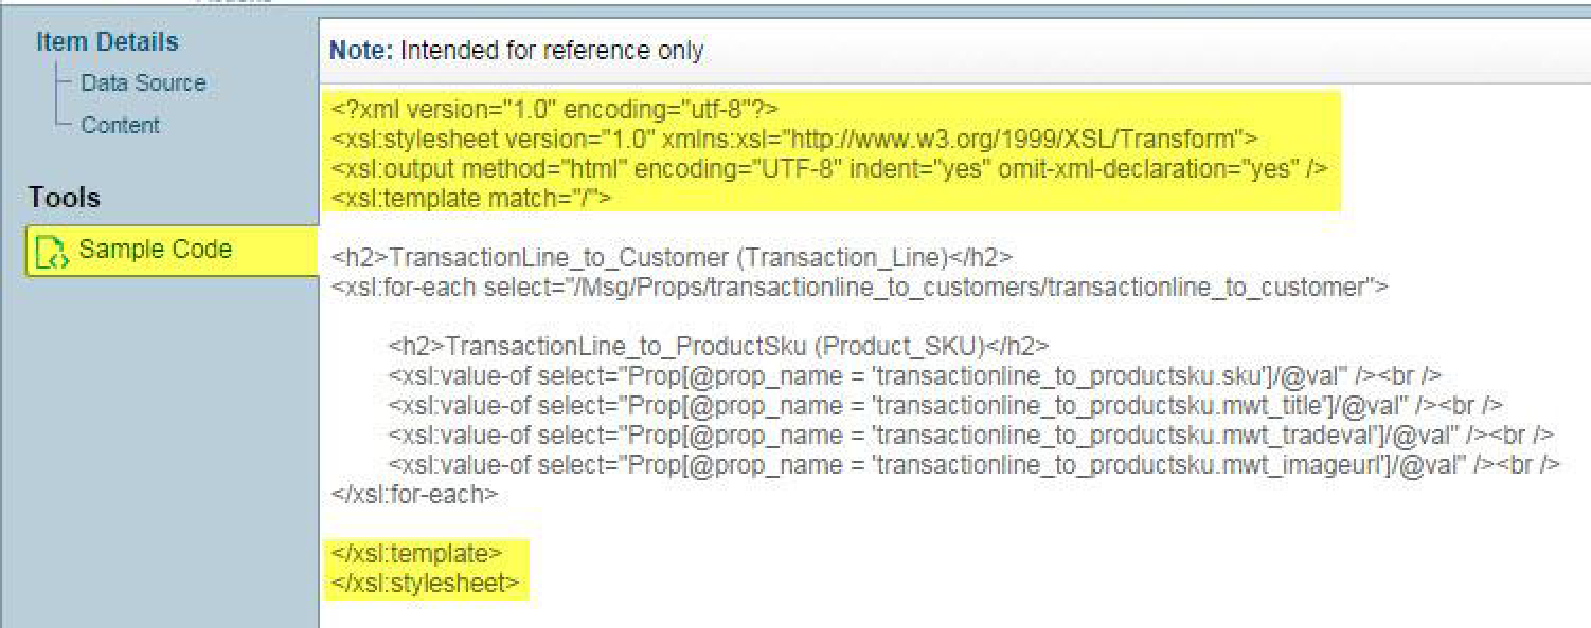
There are key elements that must be included in a valid XSL document. Messaging provides these elements when selecting the sample code option as shown in the diagram below:
XPath navigation
XPath is used to navigate through “nodes” and “attributes” in an XML document. For example, consider the following example XML and XSL files.
Example 1: XML:
<?xml version="1.0" encoding="UTF-8"?>
<?xml-stylesheet type="text/xsl" href="EXAMPLE1.XSL"?>
<bookstore>

<book lang="en">
  <title category="1">Book 1</title>
  <price>29.99</price>
</book>

<book lang="en">
  <title category="2">Book 2</title>
  <price>39.95</price>
</book>

</bookstore>
Example 1: XSL:
<?xml version="1.0" encoding="UTF-8"?>
<xsl:stylesheet version="1.0" xmlns:xsl="http://www.w3.org/1999/XSL/Transform">
<xsl:template match="/">
<xsl:value-of select="bookstore/book/title"/> <br />
<xsl:value-of select="bookstore/book/price"/>
</xsl:template>
</xsl:stylesheet>
The template match = “/” line in the file above sets the starting navigation position to the root node (or technically one node above the first node in the XML tree). From there the XML data can be accessed using a path such as bookstore/book/title to display the book title.
Using the value-of element of XSL, the code above should by default select the first node in the XML tree and display the following output:
Book 1
29.99
Additionally, we can refer to attributes in the XML tree. For instance, if we change the previous value-of statement by adding the @ symbol and referring to the category attribute found in the title node in the XML tree, the output would be “1” instead of “Book 1”.
XML: <title category="1">Book 1</title>
XSL: <xsl:value-of select="bookstore/book/title/@category"/>
Loops, if/then statements, and other common XSL elements
For-each loops
XSL can be used to display data in a number of different ways through built in structures common in other programming languages such as for-each loops, if/then statements, etc. For example, using the data from the previous EXAMPLE1.XML file, we can construct a for-each loop to extract the node,values in our XML tree and insert them into an HTML table.
<table border="1">
<tr bgcolor="#9acd32">
<th>Title</th>
<th>Language</th>
<th>Category</th>
</tr>
<xsl:for-each select="bookstore/book">
<tr>
<td><xsl:value-of select="title" /></td>
<td><xsl:value-of select="@lang" /></td>
<td><xsl:value-of select="title/@category" /></td>
</tr>
</xsl:for-each>
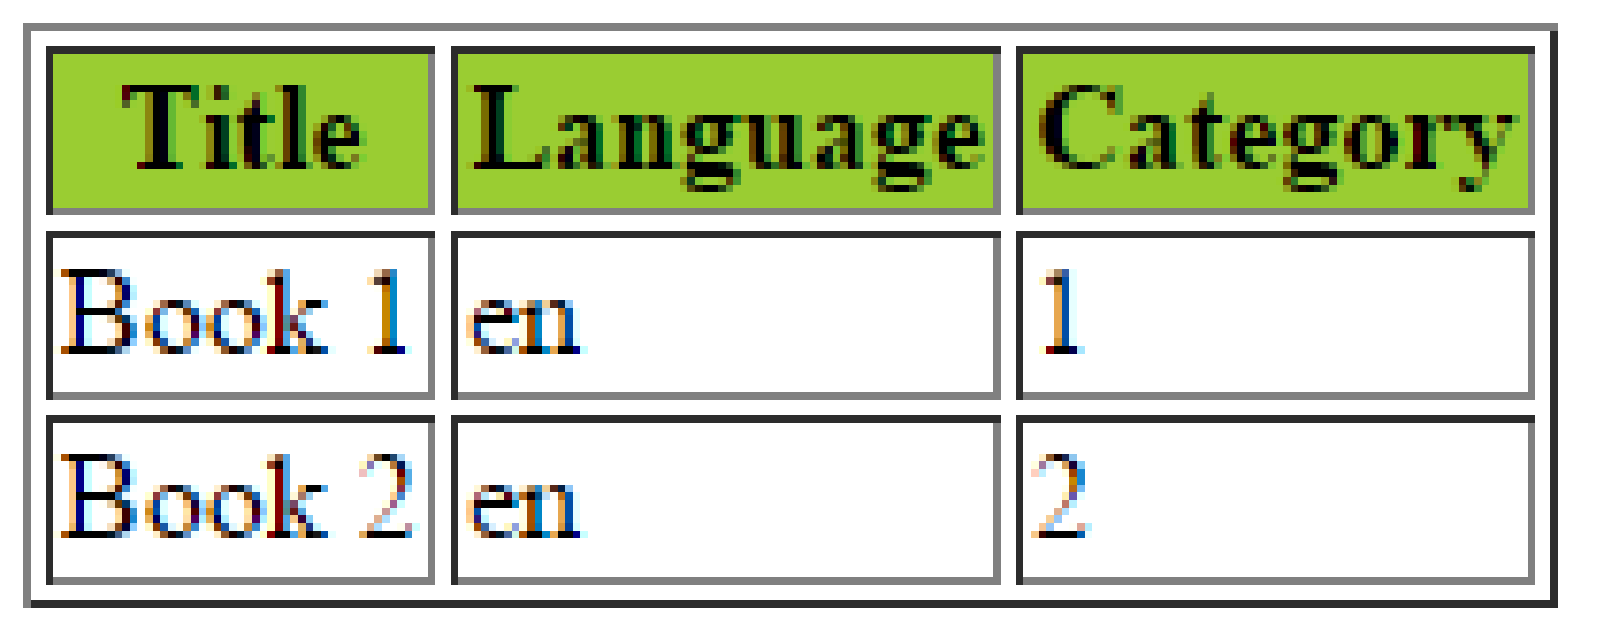
</table> The output of this XSL code would look like this:
We can further refine our output by addition certain conditions using square brackets as shown below, as well as doing things such as sorting the results according to a specific criteria:
<table border="1">
<tr bgcolor="#9acd32">
<th>Title</th>
<th>Price</th>
</tr>
<xsl:for-each select="bookstore/book[price >= 29.99 and @lang='en']">
<xsl:sort select="price" order="ascending"/>
<tr>
<td><xsl:value-of select="title" /></td>
<td><xsl:value-of select="price" /></td>
</tr>
</xsl:for-each>
</table>This will display all books priced at $29.99 and over that also have a language attribute of “en”. (Note: In addition to the “and” operator, see here for a full list of XPath operators: http://www.w3schools.com/xpath/xpath_operators.asp). Furthermore, the above code will sort the respective values in order of lowest to highest. Additional sort lines may be added directly under the first one as well to provide additional layers of sorting logic (so that for instance all books priced at the same value will be listed alphabetically by title).
Additional Notes:
-
In addition to specifying order=”ascending” it may also be necessary to add data-type=”number” in order to allow it to sort number/integer values properly.
-
Note that the “greater than” symbol in this example is written out as > instead of using the symbol. It is often necessary for the less than (<) and greater than operators to use these “escaped” values because of the way the data is parsed/processed..
-
It is important to acknowledge that the select= path for the xsl:sort and following value-of statements begin where the initial for-each loop path ends. In other words, the path for these select values is relative from the path of bookstore/book.
If tests
Instead of the for-each loop a simple “if” test may be used to check for a specific condition and then display data if that condition is met. For example:
<xsl:if test="price > 10">Do something...</xsl:if>Choose-when-otherwise
Sometimes it may be necessary to allow for multiple conditional tests. As opposed to an “if-then-else” syntax that is common in many languages, XSL uses “choose-when-otherwise” to accomplish this same general purpose. An example of this (nested within a for-each loop) is provided below:
<table border="1">
<tr bgcolor="#9acd32">
<th>Title</th>
<th>Artist</th>
</tr>
<xsl:for-each select="bookstore/book">
<tr>
<td><xsl:value-of select="title"/></td>
<xsl:choose>
<xsl:when test="price > 10">
<td bgcolor="#ff00ff">
<xsl:value-of select="title"/>
</td>
</xsl:when>
<xsl:otherwise>
<td><xsl:value-of select="title"/></td>
</xsl:otherwise>
</xsl:choose>
</tr>
</xsl:for-each>
</table>Apply-templates and Call-templates
The xsl:apply-template and xsl:call-template elements allow for nested XSL templates, and output data somewhat similar to the use of a for each loop though in many instances this approach leads to more flexible and modular code.
Variables and parameters
For the most part variables and parameters in XSL are very similar in function and syntax. These not only help make XSL code more streamlined and easier to read/write (for instance, by eliminating the need to repeat a line of code over and over again), but can also improve performance (saving a lot of lookups for example when performing pivot-table or cross-tabulation style transforms). Below is a simple example of a variable and parameter in XSL:
<xsl:variable name="title" select="bookstore/book/title"> </xsl:variable>
<xsl:param name="price" select="bookstore/book/price"> </xsl:variable>
These are declared and defined above, then their value may be referred to multiple times within the rest of the file as needed, using the syntax shown in the examples below.
<xsl:value-of select="$title"/>
<xsl:value-of select="$price"/>
Functions
The XPath language provides hundreds of built-in functions. For example:
Concat
<xsl:value-of select="concat('The book of the month is,', ' ', bookstore/book[2]/title)"/>Using our original EXAMPLE1.XML file the output would be: The book of the month is Book2
Position
<xsl:if test="position() <= 3"> Do something... </xsl:if>Displays only the first three node values.
Substring
The substring() function enables you to extract a smaller substring from an existing string. The substring is the value of string1, starting at the character at number1 and going for a length of number2 (optional).
<xsl:value-of select='substring(/bookstore/book, 2, 5)'/>Translate
The translate() function is used for finding and replacing characters in a string. For each character in string2, its respective character in string3 is replaced in string1. For example, if you wanted to replace all of the spaces in book titles with underscores...
<xsl:value-of select="translate(bookstore/book/title, ' ', '_')"/>XSL in messaging looping blocks
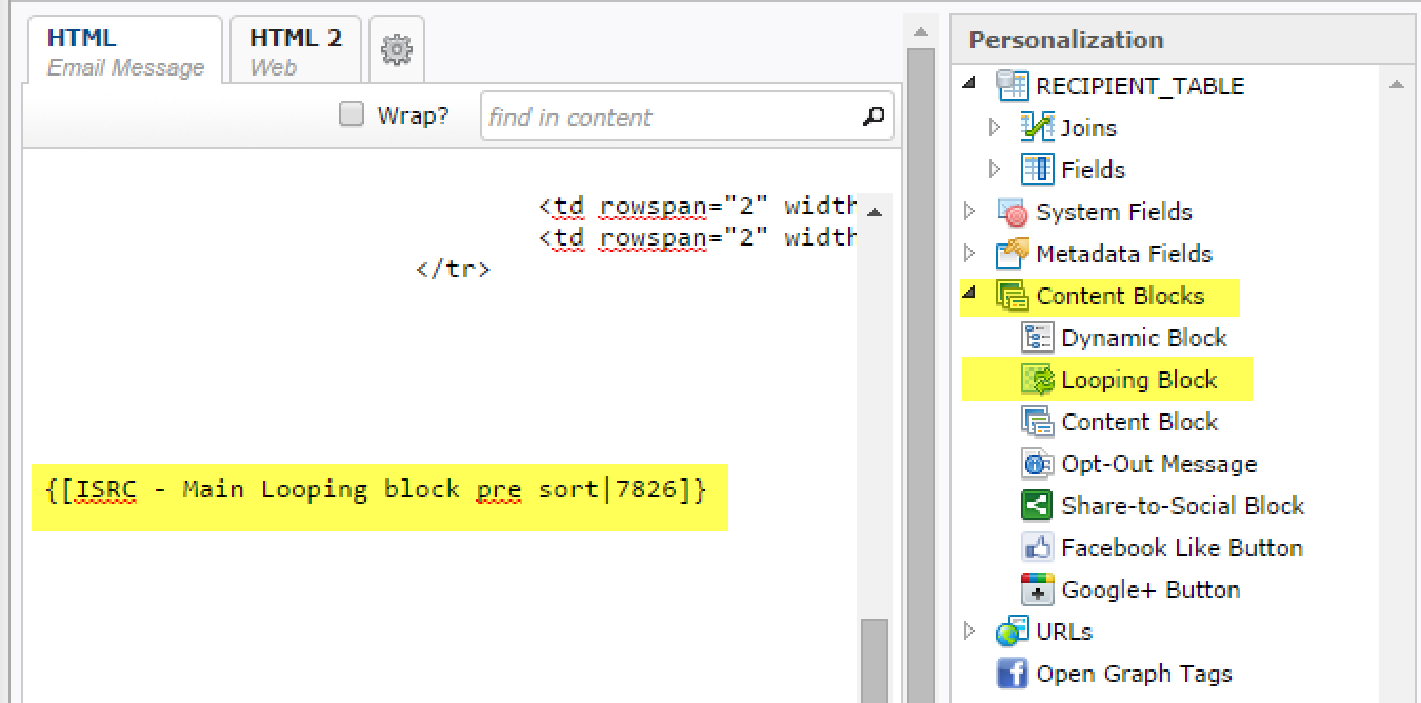
In order to leverage the power of XSL in our campaigns, we need to first create a looping block along with any necessary respective table joins, and then add it to our campaign.
Please see the screenshots below.
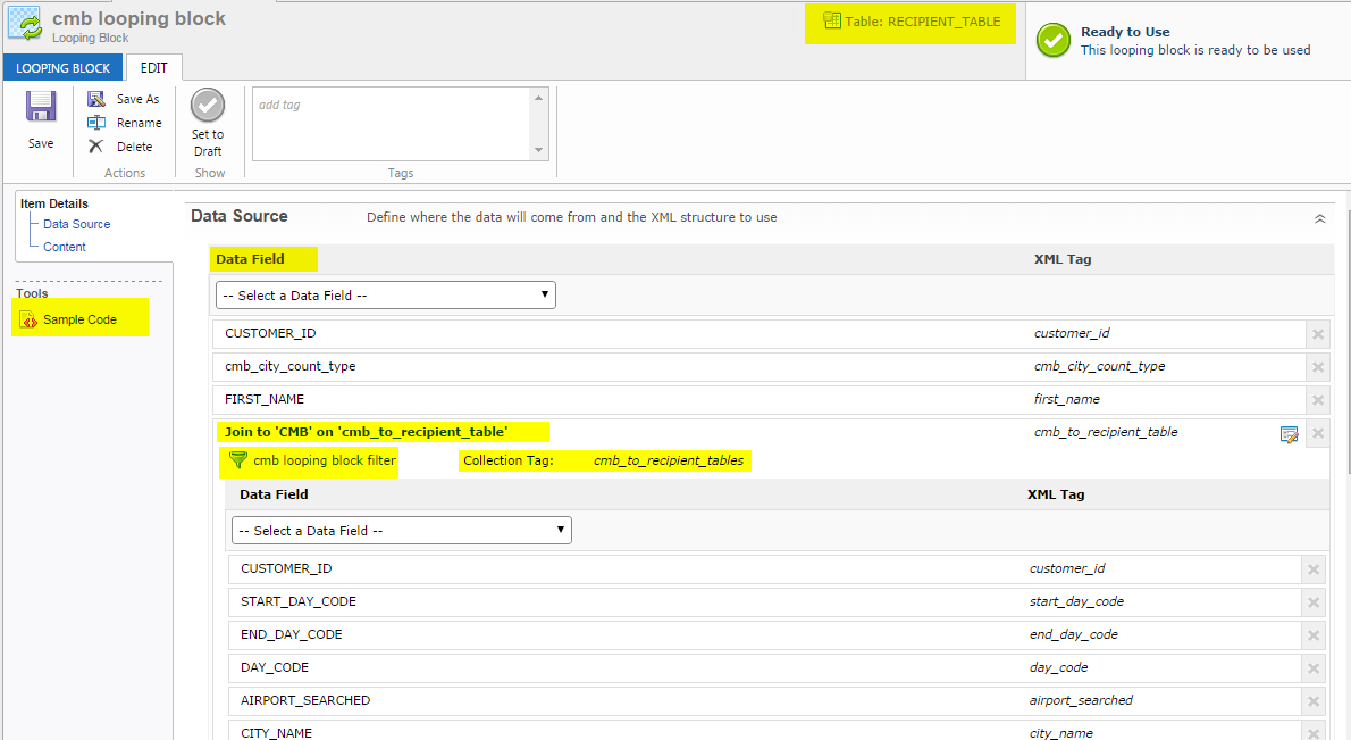
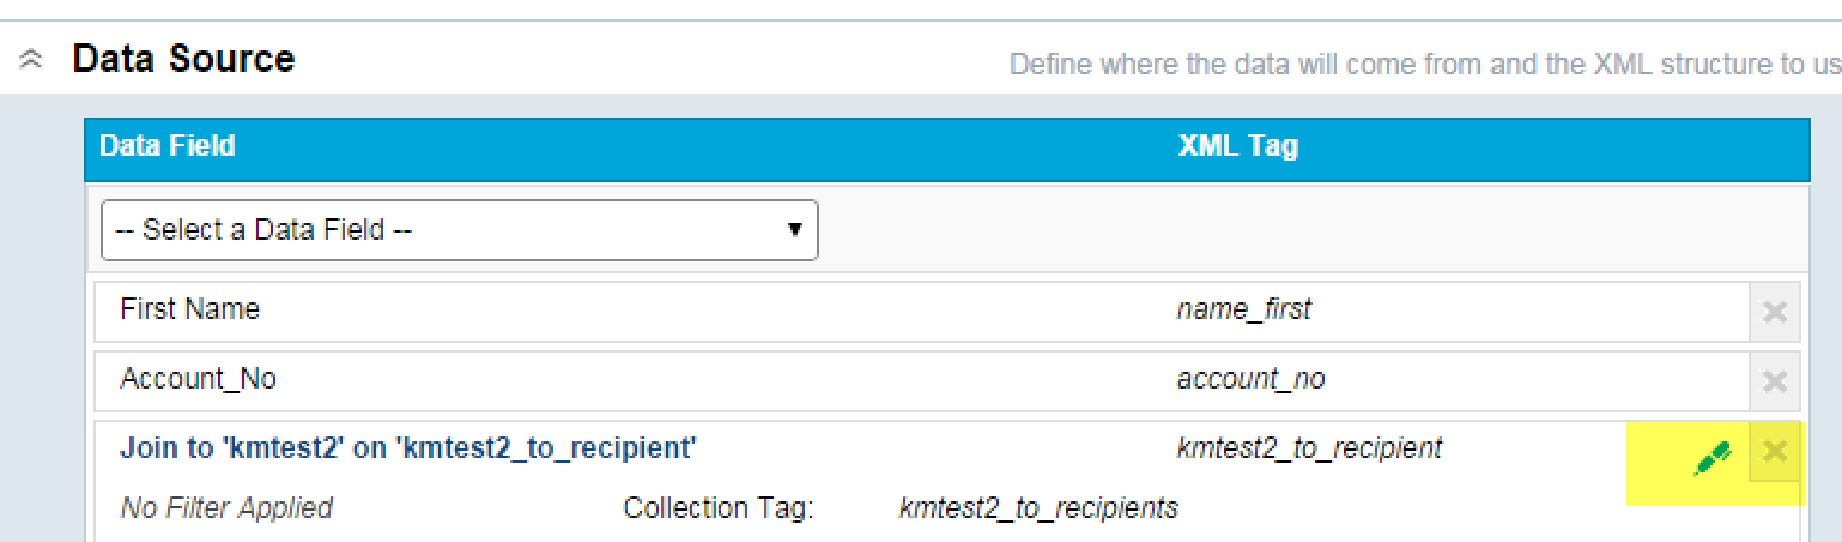
After saving the looping block, we are able to click on the Sample Code option as shown below to provide us with the general paths we will need to refer to in order to access the desired data. As mentioned previously, we do not actually see the XML generated by Messaging, so this is a helpful way to understand how to navigate to the proper XML nodes / attributes.
Note: the different paths shown in the screenshot below for the initial sending table versus the path for the secondary (joined) table.

The path to the data fields (attributes) we need from the first and second table would be:
/Msg/Props/Prop[@prop_name=’first_name’]/@val

/Msg/Props/cmb_to_recipient_tables/cmb_to_recipient/Prop[@prop_name=’customer_id’]/@val
These paths are pointing to the value of the val attribute contained in the respective Prop node. (Also, the Prop node is set to filter these results to only those with a prop_value attribute equal to the value stated in the expression). For a visual that might make this clear, see the next page.
We may infer from the sample code generated that the XML for a typical Messaging looping block looks something similar to the code structure provided below:
<?xml version="1.0" encoding="UTF-8"?>
<Msg>
  <Props>
    <transactionline_to_customers>
      <transactionline_to_customer>
        <Prop prop_name="email" val="adam@jones.com"></Prop>
        <Prop prop_name="sku" val="930945"></Prop>
        <Prop prop_name="sku" val="170680"></Prop>
      </transactionline_to_customer>
    </transactionline_to_customers>
  </Props>
  <Props>
    <transactionline_to_customers>
      <transactionline_to_customer>
        <Prop prop_name="email" val="john@smith.com"></Prop>
        <Prop prop_name="sku" val="12345"></Prop>
        <Prop prop_name="sku" val="45678"></Prop>
      </transactionline_to_customer>
    </transactionline_to_customers>
  </Props>
</Msg>
Looping block filters
We may also use filters in Cheetah Digital to further refine not only our audience, but also our dataset. For instance, using the example code above, we may wish to not only limit our audience to those that have certain product skus, but we may also want our email content to only focus on certain product SKUs (such as in the case of displaying the most popular products owned by a customer). Therefore, we may filter out the undesired product skus in our looping block filter and not have to worry about using extra XSL code to accomplish this.
Tips, tricks, and known issues
Testing XSL looping blocks
The simplest way to test a looping block is to send a proof of the email campaign that includes the looping block. An alternative method of testing, however, is to test the XSL looping block using an XSL editor with instant preview. This latter method, which involves actually generating the XML code used within Messaging, allows us to test complex code iterations more quickly without having to wait for proofs to be generated after each change. It also means we can more effectively test a variety of use cases by manipulating the customer data right in the XML without having to touch the actual data in the database tables.
The steps to testing XSL looping blocks in this manner are described below:
-
Setup your table joins and add the required fields as you normally would when setting up a looping block. (Note: Make sure there are records in your segment/filter that show they are joining to records in other tables by doing a record lookup and selecting edit).
-
Add the code below to your looping block (for now this should be the only code in your looping block):
Copy<?xml version="1.0" encoding="utf-8"?>
<xsl:stylesheet version="1.0" xmlns:xsl="http://www.w3.org/1999/XSL/Transform"
xmlns:msxsl="urn:schemas-microsoft-com:xslt" exclude-result-prefixes="msxsl"
>
<xsl:output method="xml" indent="yes"/>
<xsl:template match="@* | node()">
<xsl:copy>
<xsl:apply-templates select="@* | node()"/>
</xsl:copy>
</xsl:template>
</xsl:stylesheet> -
Add the looping block merge code to a blank email campaign.
-
Add the standard “View as webpage” code to your campaign code.
-
Send the initial proof. (Note: Do not use the “quick proof” method for this).
-
Click on View as webpage when you receive the proof. Then click on View source. (You may get slightly different behavior depending on what browser you use as far as displaying the data, but in all cases it should pull up the XML tree.)
-
Copy and Paste this source code into an XSL editor such as XSLT Fiddle (http://fiddle.frameless.io/). Place the XML in the left pane (stripping out any non-XML code such as the view as webpage link code at the top of the file and any opt-out language, etc that might be at the bottom of the file). Then whatever XSL code you want to test place in the right pane (Note: Make sure to scrub the data of any actual customer or sensitive proprietary company information before entering into any third party tool or website). You will then be able to make any needed changes to either the XML dataset itself or to the XSL stylesheet code and refresh the code to preview the output as shown below.
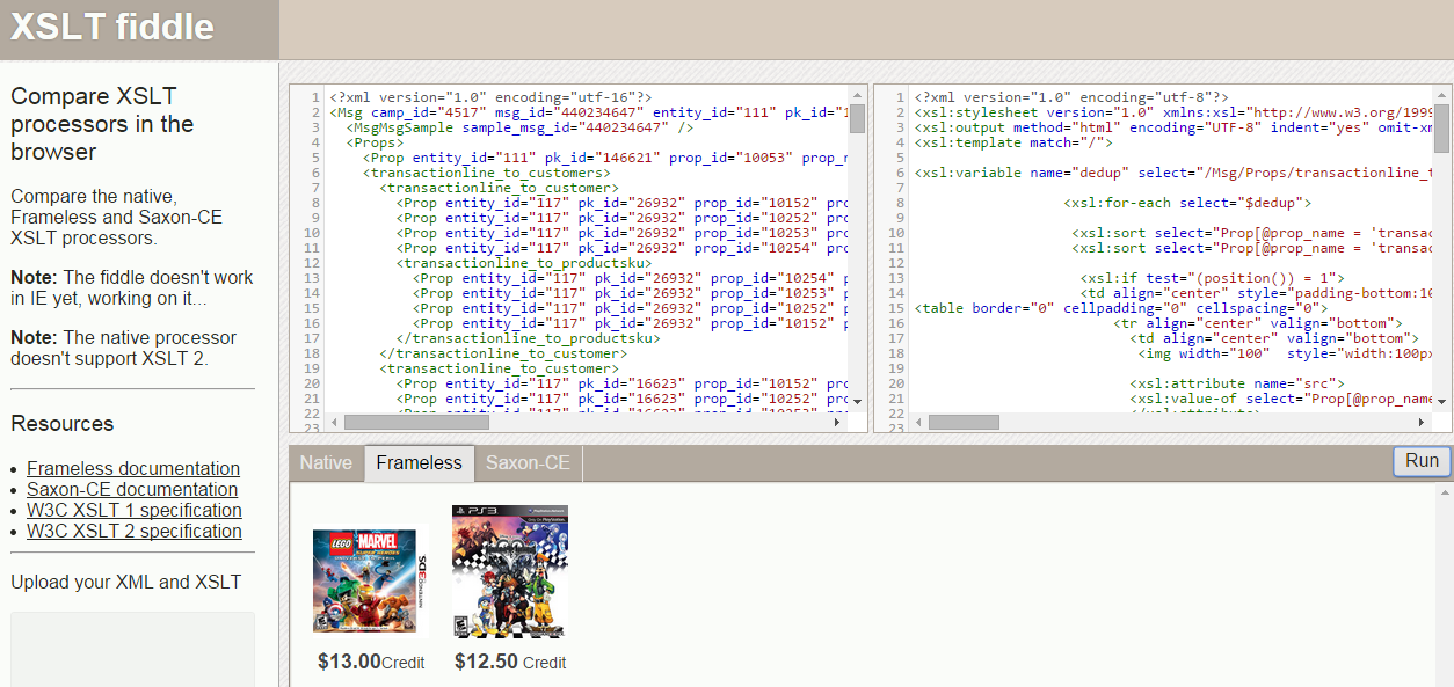
Note: You may also use http://xsltransform.net/ to preview the actual HTML output in order to validate it in relation to the rest of your campaign code (for instance, to make sure no tags are left open, etc). This tool can toggle between code view and preview mode as well to display output like XSLT Fiddle if you add the following attribute/value to the xsl:output line at the top of your XSL code: <xsl:output method="html" doctype-public="XSLT-compat" ….
-
Once your code seems to be functioning properly, replace the XSL code in your looping block with the final validated code and run your proofs in Cheetah Digital.

Other tips and known issues
Tracking links in looping blocks
Tracking links do not function automatically in Messaging within XSL looping blocks. Therefore, these need to be manually coded within the looping blocks.
Looping block filters and collection tags
If a filter is used in a looping block then that collection tag name must be different than other looping blocks that use the same data source (in other words, when you are using the same joins, but creating collections of different records).
For instance, say you have two blocks that will be used within your campaign and they both reference a join from Order Items to Orders. They both will use the same join, thus creating the same collection tag name. By default, this is fine because the collection tag is filled with the same group of records and each looping block can run fine.
If however if you add a filter to one of the looping blocks on that same join, this ultimately limits down the number of records that get inserted into the collection tag. Now when the campaign goes to run and do personalization it sees the same collection tag name, but you are trying to tell it that there are two groups associated with it (one whole group and one that’s limited down). In this scenario, it doesn’t know what to do and will give you a conflicting structures error. By renaming the one with the filter you are creating two separate groups that are both uniquely defined and thus the personalization is able to complete the loops because they are defined structures. You should only rename if you are using the same joins in more than one looping block that are used within the same campaign, other than that they should stay as generated.
Dot notation in sample code paths
When sample code in Messaging is provided with the “.” notation such as in this example:
<xsl:for-each select="/Msg/Props/recipient_table_to_hmz_region.hmz_region_to_region/crn_rates_to_regions2/crn_rates_to_region"> It will need to be re-written into two for-each statements as shown below:
<xsl:for-each select="/Msg/Props/recipient_table_to_hmz_region"> <xsl:for-each select="hmz_region_to_region/crn_rates_to_regions2/crn_rates_to_region">Looping blocks in subject lines
Subject lines only support text not HTML. If looping blocks are used, make sure to create a text version within the looping block.
Advanced examples
Example 1: Using a variable to display content based on respective child system
Objective: Need to display appropriate placeholder images with the unique look and feel for the respective child system for the Messaging account.
Description: A variable is declared with the value set to the “concept code” which is a two-letter designator setup for this client to identify the appropriate child system. This variable is then used to define the image URL path.
<xsl:variable name="conceptcode" select="/Msg/Props/Prop[@prop_name = 'conceptcode']/@val" />

<xsl:choose>
  <xsl:when test="$conceptcode = 'PB'">
    <img width="100" src="http://namwpm.eMarketing Suite.com/wpm/100090/XML_Trigger_Images/PB_No_Image_Available.jpg" alt="No Image Available" style="display:block; border:0;" />
  </xsl:when>
  <xsl:when test="$conceptcode = 'PK'">
    <img width="100" src="http://namwpm.eMarketing Suite.com/wpm/100091/XML_Trigger_Images/PK_No_Image_Available.jpg" alt="No Image Available" style="display:block; border:0;" />
  </xsl:when>
Etc, etc
  <xsl:otherwise>
  </xsl:otherwise
</xsl:choose>
Example 2: Constructing a customer-centric URL
Objective: Need to create a link in the email with multiple query strings appended to the URL using values pulled from customer data to allow customers to track their purchase item.
Description: By nesting the xsl:attribute within the <a> HTML tag, it will add an attribute to that tag based on the name provided. In this case “href” is needed to define the link URL. So the final HTML would be rendered as:
<a style=”color:#aab125;” href=”URL HERE”>Track your item</a>The URL value is defined by substituting in the value of the value-of statements.
<xsl:variable name="qon" select="concat('ordernum=', /Msg/Props/Prop[@prop_name='order_number']/@val)" />
<xsl:variable name="qzip" select="concat('z0=', /Msg/Props/Prop[@prop_name='zip']/@val)" />
<xsl:variable name="qtrack" select="'cm_ite=order_tracking'" />
<a style="color:#aab125;">
<xsl:attribute name="href">https://secure.markandgraham.com/customer-service/order-shipment-tracking/results.html?<xsl:value-of select="$qzip" />&<xsl:value-of select="$qon" />&<xsl:value-of select="$qtrack" />&bnrid=1401559&tp=<xsl:value-of select="$TrackingParams" />&cm_cat=Trans_Order&cm_pla=Main&cm_ven=Email&cm_em=<xsl:value-of select="/Msg/Props/Prop[@prop_name = 'email_address']/@val" />
</xsl:attribute>
Track your item</a> Note that the $TrackingParams variable is also included here. Currently, links within looping blocks are not trackable. If tracking parameters are needed for web events, they will have to be added directly on the link in the looping block So this is done by adding the following code to the top of the file with appropriate values coded in:
<xsl:param name="TrackingParams"></xsl:param>Example 3: Deduping an item list
Objective: Need to display games with highest trade value for Gamestop customers (this should include up to but not more than four items). Because of multiple transaction types, some customers may have multiple records for the same sku and therefore there is a need to dedup skus before displaying items in campaign.
Description: A variable is set to identify records where there is at least one “tradeable” game (where the field mwt_tradeval has some value other than null). Within a for-each loop this list is then sorted twice so that it not only displays from highest to lowest value, but also so that it lists in order of sku for similarly valued items. This then allows us to remove any skus that are the same as the sku for the item preceding it, using preceding-sibling. (This is what is referred to as an XPath Axes).
<xsl:variable name="dedup" select="/Msg/Props/transactionline_to_customers/transactionline_to_customer[Prop[@prop_name = 'mwt_tradeval']/@val and not(Prop[@prop_name = 'sku']/@val = preceding-sibling::transactionline_to_customer/Prop[@prop_name = 'sku']/@val)]"/>

<xsl:for-each select="$dedup">

<xsl:sort select="Prop[@prop_name = 'mwt_tradeval']/@val" order="descending" />
<xsl:sort select="Prop[@prop_name = 'sku']/@val" order="descending" />

<xsl:if test="(position()) = 1">
Do something...
Note that the position() function is used to specify items 1 through 4 after the deduping takes place. However, if the position function were placed in the for-each loop or variable in this case, it would limit the number of items to those first four BEFORE deduping and may cause undesired behavior with respect to the remaining code.
Additionally, if the xsl:sort is placed above the for-each loop it will not work as it must be placed within the for-each loop. Order is often important in XSL documents and it is a good idea to use an XSL validator for this purpose. Messaging also has built-in validation and will often identify and help debug XSL coding errors.
Example 4: String manipulation
Objective: The first word in a string value from a specific field needs to be included in the email and formatted so that the first letter only is capitalized. So the output of “JOHN SMITH” for instance, should be “John”.
Description: Several functions are used to accomplish this including translate(), substring(), and concat().
<xsl:param name="uppercase" select="'ABCDEFGHIJKLMNOPQRSTUVWXYZ'"/>
<xsl:param name="lowercase" select="'abcdefghijklmnopqrstuvwxyz'"/>
<xsl:param name="firstitem" select="concat(substring(/Msg/Props/Prop[@prop_name = 'list_full']/@val, 1, 1), translate(substring(/Msg/Props/Prop[@prop_name = 'list_full']/@val, 2), $uppercase, $lowercase))"/>

<xsl:for-each select="/Msg/Props"><p><xsl:value-of select="substring-before(concat($firstitem, 1,1), ' ')"/></p>
</xsl:for-each>
Example 5: Calculate a percentage
Objective: Calculate the percentage difference between hi_price and lo_price
Description: Use the format-number() function.
That's a <b><xsl:value-of select="format-number((Prop[@prop_name = 'hi_price']/@val - Prop[@prop_name = 'lo_price']/@val) div Prop[@prop_name = 'hi_price']/@val,'#%')" /> savings!</b>Example 6: Transforming date format
Objective: Change date format into MMM dd format.
Description: Add in MS libraries that support data formats to the header as shown below:
<?xml version="1.0" encoding="utf-8"?> <xsl:stylesheet version="1.0"
xmlns:xsl="http://www.w3.org/1999/XSL/Transform"
xmlns:ms="urn:schemas-microsoft-com:xslt"
xmlns:dt="urn:schemas-microsoft-com:datatypes">
<xsl:output method="html" encoding="UTF-8" indent="yes" omit-xml-declaration="yes" />
<xsl:template match="/">
Then execute the remaining XSL code using the ms:format-date function as shown below:
<xsl:for-each select="/Msg/Props/irsc_to_recipient_tables/irsc_to_recipient_table[Prop[@prop_name = 'source']/@val = 'EXACT']">
  <xsl:value-of select="ms:format-date(translate(Prop[@prop_name = 'start_date']/@val, ' ', 'T'), 'MMM dd')" /> - <xsl:value-of select="ms:format-date(translate(Prop[@prop_name = 'end_date']/@val, ' ', 'T'), 'MMM dd')" />
</xsl:for-each>
Example 7: Positioning and use of the mod operator
Objective: Display data in order of ascending "rank", using 2 columns and alternating background colors in each row as shown below:
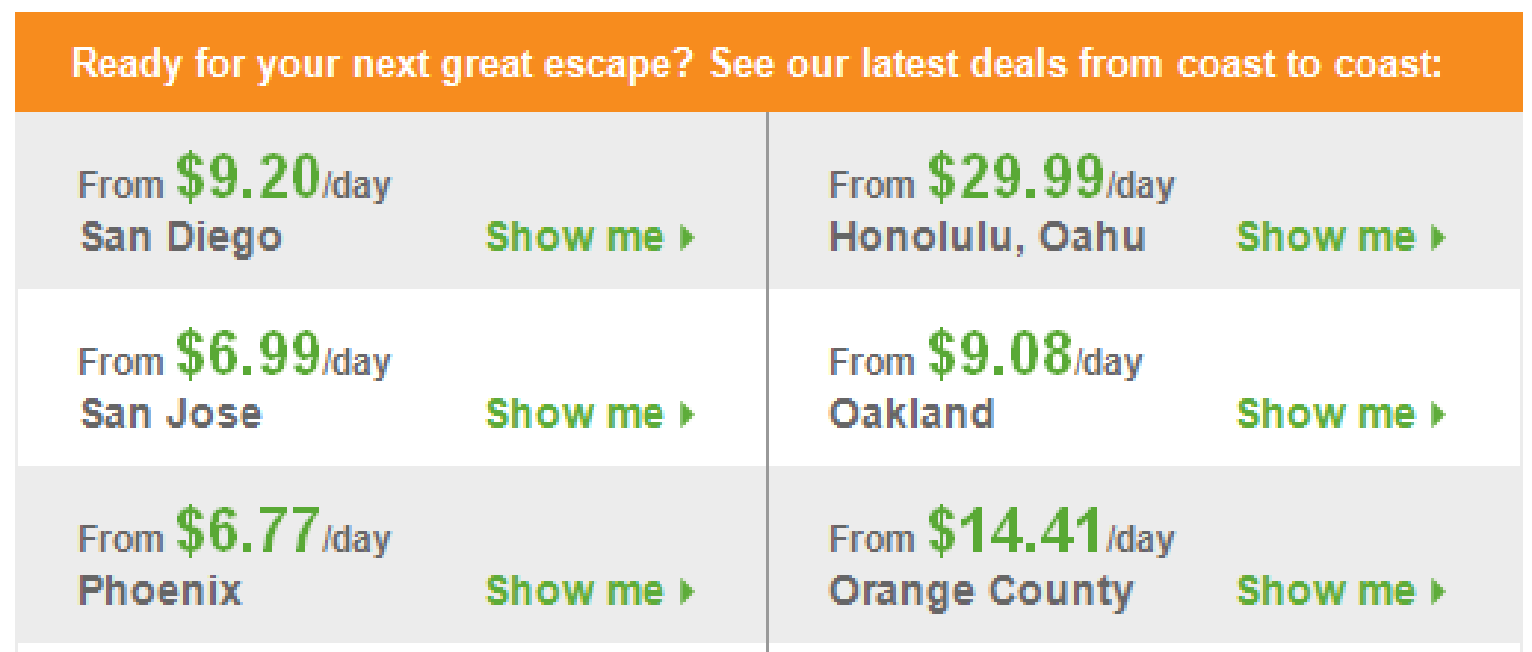
Description: The “modulo” operator, written in the example below as “position() mod 2 = 1” is used to separate content into two rows as well as to apply background shading to alternating table rows. The position function equates to the number of the current node (translating to 1 mod 2 = 2 for the first node). The modulo operator finds the remainder after division of one number by another. For instance, the expression "5 mod 2" would evaluate to 1 because 5 divided by 2 leaves a quotient of 2 and a remainder of 1. (In the case of 1 mod 2, the remainder would be 1 since 2 goes into 4 zero times, leaving a remainder of 1).
In the code below, the mod operator is first used to define when to set the new table row. Since the position of the first node would translate our expression to “1 mod 2 = 1”, and since this is a true statement, the code below instructs the processor to add a new table row. Since this would be false for node 2 it will wait for node 3 to add another table row. In the second instance of the mod operator we must recognize that for the background shading we need to account for table cells 1 and 2 (representing the first row) being one background color and cells 3 and 4 being another color. Therefore, position() mod 4 = 0 or (position()+1) mod 4 = 0 defines a specific color for cells 3 and 4 in every grouping of four.
<xsl:for-each select="/Msg/Props/recipient_table_to_hmz_region">
<xsl:for-each select="hmz_region_to_region/crn_rates_to_regions_nofilter/crn_rates_to_region">
<xsl:sort select="Prop[@prop_name = 'deal_number']/@val" data-type="number" order="ascending"/>
<xsl:if test="(position() mod 2) = 1">
<xsl:text disable-output-escaping="yes"><tr></xsl:text>
<td bgcolor="#ececec" width="1"></td>
</xsl:if>
<td style="font-family:arial;font-size:12px;color:#666666;" align="left" height="60" width="254">
<xsl:attribute name="bgcolor">
<xsl:choose>
<xsl:when test="position() mod 4 = 0 or (position()+1) mod 4 = 0">
<xsl:text disable-output-escaping="yes">#ffffff</xsl:text>
</xsl:when>
<xsl:otherwise>
<xsl:text disable-output-escaping="yes">#ececec</xsl:text>
</xsl:otherwise>
</xsl:choose>
</xsl:attribute>
</td>
</xsl:for-each>
</xsl:for-each>
